Reese’s Cup Remix with Brazil Nut Butter Recipe
A twist on the traditional peanut butter cup. It uses all-natural ingredients and instead of peanut butterthe chocolate shell envelopes Brazil nut butter.
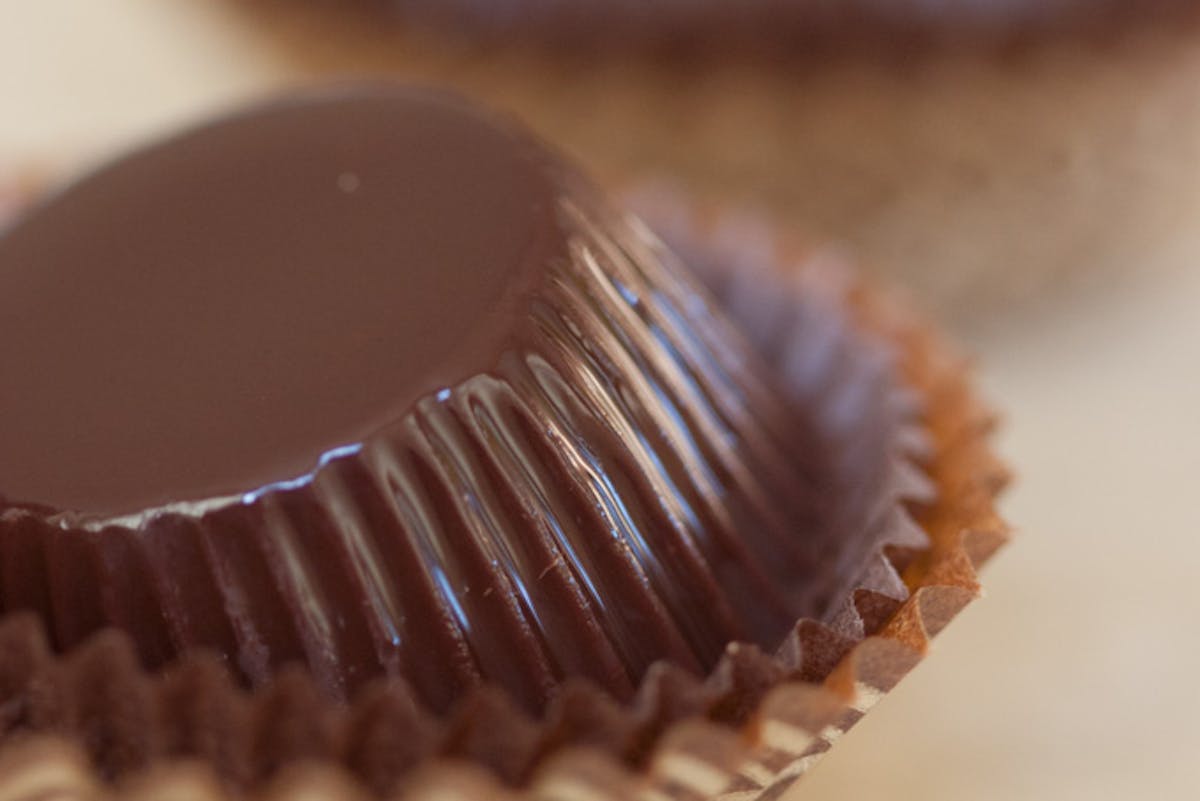
The Thin Mints were such a big hit, I thought I'd try one more remix this week. I suspect I'm not the only one out there with an affinity for peanut butter cups - sweet, nutty centers robed in chocolate. I wanted to do a version that played off the general shape of the traditional peanut butter cup, used all-natural ingredients, and had a contemporary twist to it. The twist? Instead of peanut butter, I went with a homemade Brazil nut butter filling.
As a kid Brazil nuts were the ones I always left at the bottom of the mixed nut bowl. I'm trying to make up for it now and there seem to be endless ways of integrating Brazil nuts into contemporary recipes - sliver them, puree them, toast them, grate them, use them as a thickener, make them into a nut flour, use them in cookies, biscotti, etc, etc, etc. I'm also on the lookout for an unrefined Brazil nut oil....
The nuts: Some are as big as a giant's thumb, they have a reddish-brown skin, and a taste that to my palette is somewhere between a macadamia and a blanched almond. You can read more about their nutritional profile here.
Recipe development and outcome: Making homemade nut butter cups is a challenge and a bit technical at a few stages. If you know this going into the project, there it is less likely that you will end up frustrated (maybe). For this exercise I used special plastic chocolate molds (that have been collecting dust in my cupboards for years). I suspect you could have more "homemade" looking results using tiny cupcake wrappers.
The taste and texture: The flavor of the Brazil nut isn't as pronounced (even when toasted) as peanuts or say, black walnuts. The nut butter I made for this recipe ended up nicely subtle with a prominent marzipan-ish flavor. Getting the amount of salt right was key, or the nut butter would have been completely flat and blah. Texture? The filling for a typical peanut butter cup is often a shade shy of solid. The filling here is more fluid, as you would expect from a homemade nut butter. The next time around I might firm it up a shade, but it is quite nice and natural as it is...
Pitfalls: You need patience to make these. Your kitchen will inevitably end up a mess. When it came time to pop the cups out of their molds (after setting overnight), my rate of success wasn't as high as it should have been - I cracked more than a few. What's the trick? I bet David knows the trick. When I finesse that part of the process, I'll update the recipe. The other thing I might do next time is have three different nut butter fillings on hand (black walnut, brazil nut, and the more familiar peanut butter) - do a range of cups to serve on a sample plate. The nut butters set off against the background of fine bittersweet chocolate is a real treat, being able to taste through a spectrum would be fun.

Brazil Nut Butter Cups Recipe
1 1/2 cups Brazil nuts, loosely chopped
1 teaspoon macadamia nut oil (optional)
2/3 cup organic powdered sugar (I use Wholesome Sweeteners brand)
~1/2 teaspoon finely ground sea salt
a couple pinches of chile powder (opt)1 9.7-ounce bar of Scharffen Berger bittersweet chocolate, finely chopped
Special equipment: chocolate molds, piping bag.
Prep for your chocolate molds: Line a baking sheet with parchment paper or a Silpat. Place a cooling rack on top of the parchment. Make sure your chocolate molds are clean and dry.
Make the Brazil nut butter: In large (dry) skillet over medium heat, toast the chopped brazil nuts until they are fragrant - 6 minutes or so. Like pine nuts, these nuts are high in natural fat, and they will burn and go to black in a heartbeat if you don't keep an eye on them. let the nuts cool for a few minutes and transfer them to a food processor (hand blender doesn't do a good job here, I tried). Add the macadamia nut oil and puree the nuts for a minute or so. The nuts will turn to a paste and then into a nice spreadable butter. Add the sugar and blend. Now add the salt a few generous pinches at a time, to taste. You need the salty aftertaste to highlight the subtleness of the Brazil nut flavor. This is where I put a few pinched of smoked serrano chile powder in as well. Transfer to a piping bag, or a plastic bag with the corner snipped off and set aside.
Temper the chocolate: (this is how you get that nice shine on your chocolate)
Place 3/4 of the chocolate in the top of a double boiler to melt. I stir once every few minutes, but try not to dote on it. When the chocolate is nearly melted, remove it from the heat and add the rest of the chocolate a bit at a time, gently stirring in each addition until completely melted. Smear a bit of the chocolate on your parchment paper, if it sets in a couple minutes, you are in business.
Fill your molds: Partially fill each individual cup with chocolate, pick up the mold and tilt it around so the chocolate coats the sides of each cup from top to bottom. Turn the entire mold upside down and place it on the cooling rack to let any excess chocolate drip down onto the parchment (you can reuse this later). Let the chocolate set 20 minutes or so before flipping and piping the brazil nut butter into each cup (3/4 full), don't fill all the way to the top or you won't be able to seal the cup closed. After filling with the nut butter, pour another layer of chocolate across each cup to seal in the filling. Gently rap the mold on the counter once or twice to release any air bubbles. I pulled a straight edge across the molds to level out the chocolate, but it sort of messed up the temper on the bottoms a bit when I turned them out (maybe there is a better way of doing this?). Let the cups set in the refrigerator for at least an hour.
Turn them out (again any tips for this step are very welcome, I suspect it all goes back to how you pour the chocolate?).

Comments are closed.
Apologies, comments are closed.
Comments
When I’ve made chocolate cups I found I had best results when I put the molds in the freezer for a few minutes before putting the chocolate in them. I don’t really know why this makes them come out in one piece more often, but it works for me. An idea why: Cold stuff contracts & gets smaller, so if the molds are already cold & smaller, they won’t shrink any more when you put them in the fridge or freezer. …just an idea for you to try.
Heidi,
I’m so thrilled to have found this site. You do such a wonderful job. All your visitors seem to be cultured and smart people too. I feel like I’m in such good company when I visit. It feels a bit like a gourmet party full of interesting people and good food, but without the calories (unless I make the recipe! ;o)
Peace,
Haleh
This looks wonderful.
I have some Brazil nuts in the shell, but I gave up trying to do anything with them after trying to crack a few. Do you have any tips for getting them out of the shells more easily?
your experimentation is absolutely inspiring, keep it up! these look absolutely wonderful and for all the cracking i think that sheen just makes up for it! never had brazil nut butter before but this definitely makes me want to try it.
brazil nuts are great!!
I’m from Brazil and I LOVE all kinds of our nuts ;P but I haven’t eaten it as butter. I need to taste it someday 🙂
this is a wounderful site i can find awsome things to try i myself am only in high school but i plane to make cooking my carrer
I too left brazil nuts at the bottom of the bowl–thankfully… I found out as an adult that I am allergic to them!
I’d suggest maybe using a silicone mini-muffin pan. You don’t get the nice ridges (at least, not on the ones I’ve seen), but the molds are so flexible the chocolates probably pop right out. They also make silicone ice cube trays in various shapes, so that would work for fancier chocolates.
Thanks for the insight David. I think you are right, I got a nice shine to the chocolate, but def. no contraction.
Krista, you know…I can’t remember where I got those wrappers. They’ve been in one of my cupboards for years – maybe someone else here has stumbled on some that are similar recently. I would like to replenish my supply at some point. I love the gold detailing.
beautiful! can I ask for your source for the paper liners?
MMM.mmmm.mmmmm.Sounds utterly sinful and totally delicious.
As for the cracking, my mom always popped her chocolate molds in the freezer until the chocolates are just frozen. Then a good whack on the counter and they’d all pop out. The short time in the freezer never hurt the quality in any way. She has a cake and chocolate business, so I grew up watching her make hundreds of thousands of chocolates. 🙂 Mmmm, I could use one of those delicious-looking brazil nut butter cups right now. Thanks for the recipe Heidi!
Yums! That looks so great! Thanks for sharing it!
david’s your guy and his advice is spot on.
you may find this link useful too> http://www.baking911.com/chocolate/mold.htm
In my country, Argentina, this nuts are called “castañas de Pará” (Pará’s chestnuts). They’re closely the cheapest ones during Christmas Season. I still wonder why we eat dry fruits in the middle of the summer…
wow heidi, these look amazing! I have always had a love for peanut butter and my friend gave me my first reese’s cup a few weeks ago and I’m so addicted!! I’m definetly gonna make these…
Thanks for so enterprising a recipe cook book. I had been told to do my own cooking in an afterlife. So I began to make a meal for the poor for a day, each day, and the recipe made pleased me for the taste of it all by a spoonful. Now after the last eight months of passing on a housemade meal for the poor, I am convinced it is a good thing to make and tell on anyone living whether needy is clear in my country by the look of any broken legged mendicant, or a hobo in an derelict bus stand and so forth. Thank you for all your help in guidance unto a new set of recipes. Good bye!
Thanks for so enterprising a recipe cook book. I had been told to do my own cooking in an afterlife. So I began to make a meal for the poor for a day, each day, and the recipe made pleased me for the taste of it all by a spoonful. Now after the last eight months of passing on a housemade meal for the poor, I am convinced it is a good thing to make and tell on anyone living whether needy is clear in my country by the look of any broken legged mendicant, or a hobo in an derelict bus stand and so forth. Thank you for all your help in guidance unto a new set of recipes. Good bye!
Beautiful results! I suspect your cracking problem is a result of chocolate not correctly tempered (the method you used is often used as a ‘quick-tempering method’ in some books, but I find it’s inconsistent.) Tempering correctly makes the chocolate contract as it cools; it naturally pulls away from the sides of the mold. Another tip is that most chocolatiers use polycarbonate or plastic molds over and over again, and they retain a bit of cocoa butter (ie: oily) residue, which helps chocolates slide out without breaking.
(You can also skip the tempering step if you store them in the refrigerator.)
The upside of breaking so many, however, is that you have an excellent excuse to eat them. But it doesn’t sound like you needed one!
I sure am glad I stumbled onto this site. First I saw the Thin Mint recipe, now this one. I love peanut butter cups & can’t wait to try it.
Wow, I am super impressed. You are my Chocolate Goddess – honest! I am putting on weight just looking at the pix and reading this post.
This sounds positively delightful! It might be interesting to try something different to make the chocolate cups – take a small, new paintbrush, such as the sort that are used for watercolor paintings, and paint the chocolate into the cup molds. Those cups will harden in the fridge in only a few minutes and can then be filled, sealed and chilled for another ten minutes or so. I’m not sure how it would work with a filling other than peanut butter, though…it’s worth a try. 🙂
Hi Heidi,
It looks like such an involved procedure! And sure they look beautiful, and the brazil nut twist sounds intriguing, although the idea of having them with three different nut butters sounds even better. I am possessed with reese’s, and have always thought it would be neat to make some on my own but never really gotten around to it, except maybe I could try a Nigella Lawson version of it, in which you simply make chocolate-peanut butter layers in a tin and cut into squares.
Heidi, how very industrious of you. Sounds both exhausting and delicious.
these are beautiful!
i, too have always left the brazil nuts at the bottom of the bowl. ! i am re-inspired to give them a try – ANYTHING in chocolate for me!
🙂
http://www.naturaw.com and http://www.rawfood.com both carry unrefined organic brazil nut oil from Nature’s First Law.
While searching the archives, I came across the post for Mesquite Chocolate Chip Cookies, which led me to Organic Unrefined Brazil Nut Oil. It doesn’t look as though you can buy the oil directly from the website, but both rawfood.com (http://www.rawfood.com/Products/0933.html) and NatuRaw (http://www.naturaw.com/Natures_First_Law_Brazil_Nut_Oil.html) offer it from Nature’s First Law.
you are dedicated of late, to sabotaging my diet;) these sound scrumptious, and now i’m thinking of many exotic nut butter possibilities. these can be so dangerous:D
Comments are closed.
Apologies, comments are closed.
More Recipes
Weekly recipes and inspirations.
Popular Ingredients